How to keep debug & release data separate for macOS app development
You most likely are going to use the app you are developing for yourself. There is a small problem though: debug/test builds and your release version use the same data.
For macOS apps the UserDefaults and other application-data is commonly stored under a bundle-identifier. For sandboxed apps that’d be in ~/Library/Containers/your.identifier.App. The issue then is that both Xcode/debug builds and your actual use of the release version use this same location.
While you could use #if DEBUG directives to store app-data somewhere else this is harder to do for UserDefaults.
I’ll show you two ways how to configure a different bundle-identifiers for debug & release builds in Xcode. A faster one and a more involved, but better documented approach.
Option 1: Quick and easy
Open your Xcode project, select your product target and then Build Settings. From there find the Product Bundle Identifier configuration, expand it and for the Debug key set the identifier to your.identifier.App.debug
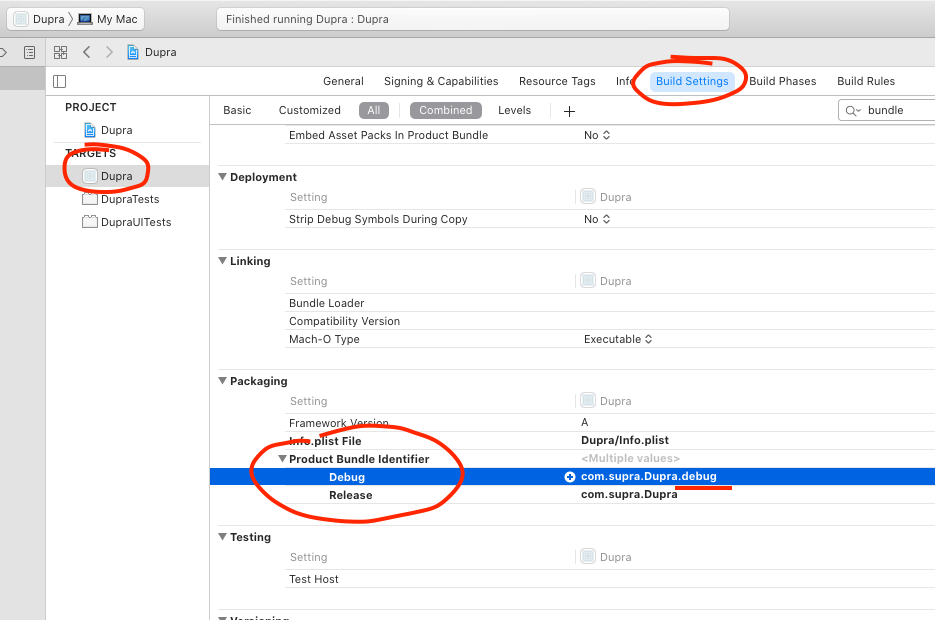
Now when you build and run your app in Xcode all data will be under your.identifier.App.debug while the release version uses the proper your.identifier.App bundle-identifier.
Personally I prefer the more involved version using xcconfig files as it allows me to document settings.
Option 2: Using xcconfig-files
You might not know about xcconfig-files. There is a good primer that helped me understand on NSHipster. Basically, everything you can configure in the Xcode project can also be done using xcconfig-files.
Create folder and files
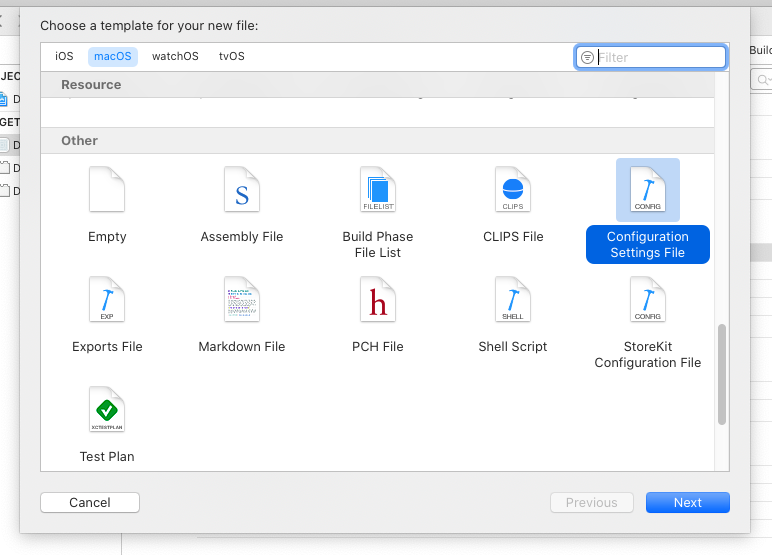
Start off by creating a new folder to store the config files in. I like to have them in xcconfig/ in the project root. Then create two new configuration files using New File ->Configuration Settings File.
For this I’m choosing to create a common.xcconfig and Development.xcconfig file. You can put a lot in there, but for this particular example we set only the PRODUCT_BUNDLE_IDENTIFIER (and organization name).
Here is common.xcconfig:
// Custom value to use with the identifier
ORGANIZATION_NAME = com.supra


// "PRODUCT_NAME" is configured in the xcode project by default!
// You could also set it via "PRODUCT_NAME = Dupra" in here
//
// If you do that make sure to also delete that value in the Build Settings, same as with the "PRODUCT_BUNDLE_IDENTIFIER".

PRODUCT_BUNDLE_IDENTIFIER = $(ORGANIZATION_NAME).$(PRODUCT_NAME)

// Set other things as you like..
and Development.xcconfig:
// Include common config to get any shared configuration
#include "./common.xcconfig"

// Define a different bundle identifier for development builds
PRODUCT_BUNDLE_IDENTIFIER = $(ORGANIZATION_NAME).$(PRODUCT_NAME).debug
Tell Xcode to use xcconfig files
Go to your project settings, make sure the Info tab is selected. There under Configurations expand both Debug and Release. Then for the app targets (not for tests) set the configuration file to Development and common respectively.

Clear out existing Build Settings
Finally we need to remove the already existing build settings. Still in your project settings select the target and then open the Build Settings tab. There locate the Project Bundle Identifier value and delete it. The value should stop being in bold and immediately reflect what you configured in your xcconfig files.
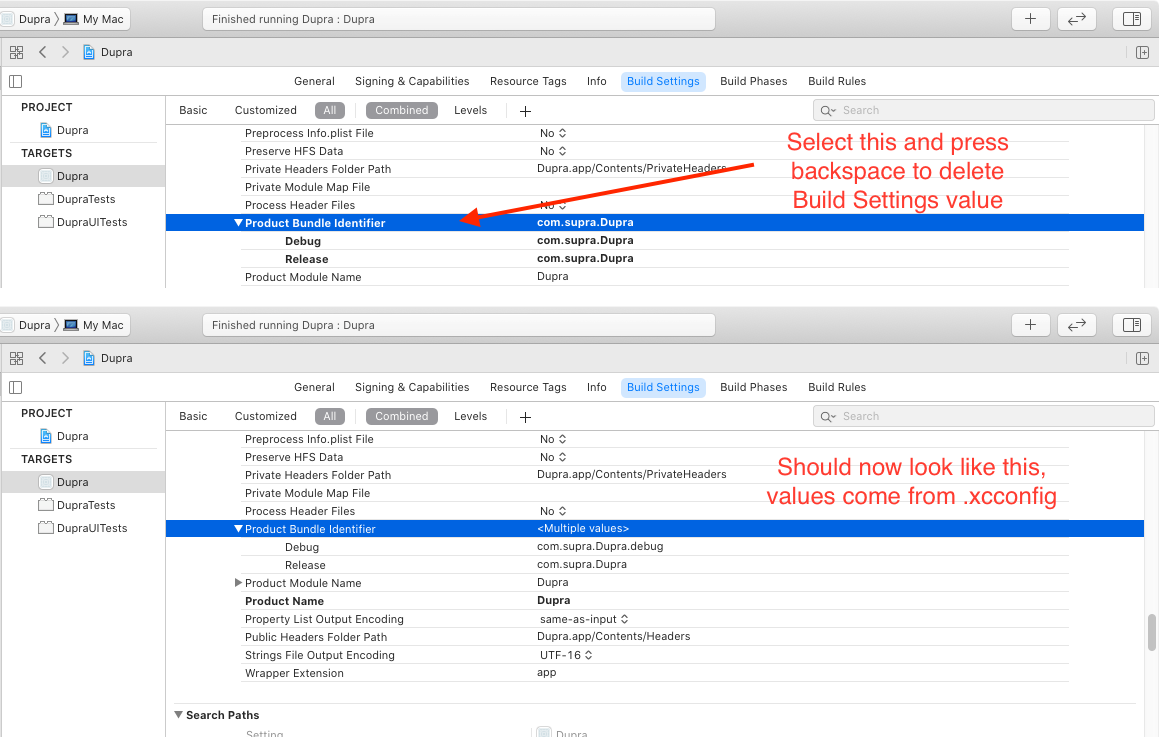
You can test that everything works by changing the value in the xcconfig file, then head back to the Build Settings. It should show the updated value right away.
Done. Same as with option 1, if you build and run your application it should now use whatever bundle-identifier you specified in the Development.xcconfig file.
Now you can clean out ~/Library/Containers/your.identifier.App.debug or UserDefaults (using defaults delete your.identifier.App.debug) to your hearts content without interfering with your actual production data.